Thursday, 7 April 2016

Syncing iPhone to a New Computer

Syncing iPhone to a New Computer


Did you get a new computer and now want to sync all your iTunes and iPhone data to the new computer? For anyone going through this process, take comfort in knowing that there is a simple way to seamlessly transfer all music, photos, data and iPhone apps to the new machine. There are quite a few articles discussing this but having to wade through all the technical data is daunting. In short, here is a simple process that worked for me. Note, I installed Windows 7 on a new harddrive so I still had all my old data after the new install. If you are doing an upgrade, be sure to backup all your data for the move and you will still be able to use this migration method.
    1. Upgrade to the latest version of iTunes (this will make the transition easier as the new machine will also be running the same version of iTunes)
    2. Sync iPhone on old computer for the last time
    3Deauthorize iTunes on the old machine
    4. Copy the entire My Music folder from the old computer to the new computer
    5Install the latest version of iTunes on the new machine
    6. Plug in the iPhone on the new machine and sync
    7. Re-setup any preferences (where to sync music, photos, videos, contacts etc…) and re-sync again on the new machine and authorize the new iTunes
My original setup on the old iTunes machine was pretty much default and I just let it control most of the settings. So by setting iTunes up on the new machine similarly, I was able to just copy the entire My Music folder (where the iTunes folder is stored in) and let iTunes re-sync everything. iTunes did not miss a beat and did not complain about any missing libraries (or anything else) on the new machine. To my delight, it just continued to sync with my iPhone as if it was running on the old machine.
So if you are moving to a new computer and want to sync your iPhone to a new computer, give the above process a try. As with any computer move, just be sure to have backups of all your data before the move. Smooth syncing!

How to Output Sound from Speakers and Headset Simultaneously

How to Output Sound from Speakers and Headset Simultaneously


Computers are a wonderful thing but sometimes, the simplest tasks seem to be the most difficult to accomplish. Have you ever been frustrated by repeatedly having to unplug your headset from the front of your computer just so you can hear audio from your speakers? Or are you savvy enough to have used a splitter so that both your headset and speakers output audio simultaneously. I am one to hate spending money on parts when there is absolutely no need to do so. So I am one of those who just plug in and unplug my headset. This workaround became such a chore and annoyance that I finally dug into my Windows 7 sound card setup and figured out how to output audio simultaenously from the speakers and the headset! It sounds like a silly discovery but for those of us who regularly use Gmail calling, Skype and various audio tools like Audacity (for editing our podcasts), this solution finally brought peace and harmony back to computing.

The following are instructions and screenshots of a Dell Vostro 410 with an on-board Realtek sound card and the Realtek HD Audio Manager. Your setup may be different and simultaneous audio output to speakers and headset may not be supported by your sound card, but for those of you who also have this common setup, here is your solution.
Step 1: Open Realtek HD Audio Manager
sound from speakers and headset
    – click on “Device Advanced Settings
    – Make sure “Mute the rear output device, when a front headphone plugged in” is selected
Step 2: Click on Connector Settings Folder Icon
sound from speakers and headset
    – Check “Disable front panel jack detection”
Step 3: Make sure “Speakers” is set as default device
sound from speakers and headset
This should allow you to send audio to your speakers and headset simultaneously without needing an external splitter. Also, be sure to go into your settings and select a higher Default Format since most speaker setups will only have a medium setting and most headsets can deliver a higher audio resolution.
So enjoy using both your speakers and headset without ever having to unplug and re-plug in the headset jack. I know I am!

Kingston 32GB Class 10 SDHC Cards – SD10/32GB versus SD10/32GBCR

Kingston 32GB Class 10 SDHC Cards – SD10/32GB versus SD10/32GBCR


It came time for me to purchase a new SDHC card and the requirement was that it had to be fast enough to cope with the high demands of dSLR burst-shooting and HD video recording. Given the current price point in Canada, the biggest bang for the buck for a branded SDHC card at this moment is a Kingston 32GB SDHC Class 10 card. For me, this card (including 12% tax) works out to be $2.66 / GB. Kingston is a reputable brand and their memory cards are significantly less expensive than the professional Sandisk Extreme line of memory cards. So after checking a few reviews and speed charts, I decided to buy the Kingston card and noticed Canadian retailers carried 2 SKU’s for this product; SD10/32GB versus SD10/32GBCR. In general, the CR version was about 10-20% lower in cost. Kingston’s website does not show any references for the lower cost CR version. The good news is Kingston support has confirmed that these two versions are identical products. The CR designation is “an international part number which is used for marketing purposes only. There is no physical difference as far as the actual product is concerned.” This was good enough for me. Once I receive card, I will post back about its capabilities for use in a newer dSLR. So if you are considering a Kingston 32GB Class 10 card for your photography and video needs, be sure to check and see if your retailer carries the lower cost SD10/32GBCR version.
***UPDATE*** 
November 17, 2010
So after receiving the product, I can confirm that although the UPC code says SD10/32GBCR, the actual SD card shows SD10/32GB (just like the image in this post). Looks like these 2 SKU’s are indeed used for the same product. Just find the lower cost version and purchase that one instead.
************

[SOLUTION] How to Tether an iPad 2 to an iPhone (including 3G & 3GS) without Jailbreaking

[SOLUTION] How to Tether an iPad 2 to an iPhone (including 3G & 3GS) without Jailbreaking


tethering ipad 2 to iphone 3g / 3gsMobile carriers that allow internet tethering gave iPhone users the ability to share their mobile internet connection with notebooks and tablets. This is game changing technology and has been proven very useful for users not near a Wifi hotspot or those who choose not to use a free hotspot connection. Currently, not many mobile carriers allow internet tethering so when Apple launched the latest iPhone 4 and recent iOS’s with the new Wifi hotspot feature, it was warmly welcomed as it allowed iPhone 4 users to set up their own mini Wifi hotspots to share internet connectivity. The bad news for 3G and 3GS users was that this Wifi hotspot feature was only available for the iPhone 4. So unless you jailbreakyour older iPhone, there is no way for an iPad or iPad 2 to use the mobile internet connection from a 3G or 3GS iPhone…. until today that is. Well, not exactly today, but it is only now that I found out that iOS 4.2.1 has enabled Bluetooth tethering for iPhones (even 3G and 3GS). This means I can now share my 3G mobile internet connection with an iPad without having to jailbreak. This let’s an iPad 2 grab and share the internet connection from my iPhone; although I have not tested this with other devices, I assume this would work with other Bluetooth enabled tablets like the iPad 1 as well. Of course, this only works if your mobile carrier allow your specific data plan to tether. Read on for detailed instructions on how to tether your iPad to your iPhone 3G or 3GS.

Here are the instructions to tether an iPad 2 to an iPhone 3G or 3GS. Make sure you follow these steps in the correct order:

1. Turn on Interent Tethering on your iPhone 3G or 3GS
General >> Network >> Internet Tethering – On (this is important, otherwise, Step #2 may fail)
2. Turn on Bluetooth on your iPhone 3G or 3GS
General >> Bluetooth – On
Note: Your iPhone may be smart enough to ask you enable Bluetooth right at this step
3. On your iPad 2, turn on Bluetooth
General >> Bluetooth – On
4. Once Bluetooth is enabled on your iPad 2, you should see your iPhone in the iPad’s Bluetooth list. Click on it to connect.
Note: you need to click your iPhone that is listed on your iPad. Selecting your iPad on your iPhone will not pair the Bluetooth connection.
5. Once you select to pair, you will receive a pop up on both your iPad and iPhone screens giving you a 6-digit numeric code
Your iPad pop up will give you the 6-numeric pin and your iPhone pop will ask if you want to pair Bluetooth using this pin. It’s a good way to ensure you only allow the right device to share your iPhone’s internet connection.
6. Click “Pair” on both devices
That’s it.
Once the pairing is complete, you should see the Tethering / Paired logo in the Wifi icon area. Now, you should be able to access the internet as if you were connected via Wifi. What joy for some of us old time iPhone users.
Bluetooth tethering from iPad to iPhone 3G / 3Gs
As You Can See, I Have Internet Connectivity
Although 3G tethering is slower than most Wifi connections, it’s still very usable and allow you to use the internet anywhere you have a mobile signal.
Bluetooth tethering speedtest
I do not have access to an iPad 1 but a quick message to @JohnChow and@iPhoneinCanada confirmed that the iPad 1 also has Bluetooth. So Bluetooth tethering should work for iPad 1 owners as well.
Once the word gets out, especially in areas where mobile carriers allow tethering, I have a feeling the 3G version of the iPad is going to take a nose dive in sales. Who would want to buy a dedicated 3G version when you can either Wifi hotspot or Bluetooth tether an internet connection now? Sales dipping may not mean a revenue drop for Apple mind you. Somehow, I think this is a calculated move by Apple and the mobile carriers. I am sure there is profit to be made from enabling tethering. For instance, Fido and Rogers (in Canada) only allow tethering for users with a higher cost data plan of 1GB or more / month. Realistically, Bluetooth tethering is only necessary for older iPhones. As I mentioned, the newer iPhone 4 has the Wifi hotspot featured enabled so most users will tether an iPad this way. I am guessing the only time an iPhone 4 user would want to Bluetooth tether over Wifi tethering is when they want better security while tethering.
If you have an iPad 1 or 2 and an older iPhone, give this Bluetooth tethering a try, it works if you have installed iOS 4.2.1 or later. And if you have an iPhone 4, let us know if Bluetooth tethering works with your iPad. In fact, if you have multiple Bluetooth devices, do let everyone know if multiple devices can share the 1 mobile internet connection using the above method!
Apple gets a thumbs up from me for supporting long time customers. What do you think about this move by Apple to enable Bluetooth tethering for 3G & 3GS users?

How to Download Videos from an HD DVR / PVR

How to Download Videos from an HD DVR / PVR


Recently, I ran into a major road block trying to record a few news clips from an HD DVR / PVR to a PC. A ton of research pointed me to try using firewire to download videos from the DVR to a PC. Unfortunately, there were no drivers available from Motorola for the DVR in question. There were, however, third party drivers available but they were not supported in a Windows 7 64-bit environment. Even if they were, I would not have installed them regardless since it was not supported by Motorola. My only option was to find a cost effective way to capture directly from the HDMI or component out of the DVR. Here is how to download and capture video from an HD DVR; see final video below.

AverMedia Game Capture HD versus Hauppage HD PVR
Capturing via HDMI was not an option as this port on the DVR has copyright protection. In addition, @StephenFung from FutureLooks reminded me that equipment that can handle capturing video via HDMI was professional-grade and would cost accordingly. The only option remaining was to capture via component out. The two options available are Hauppage’s HD PVR andAverMedia’s Game Capture HD (former ~$200; latter ~$150). These are dedicated units made to capture video signals from HD DVR’s and game consoles like the Playstation, Nintendo Wii and Xbox 360.
Leaning Towards AverMedia Game Capture HD
A quick read of reviews pointed to the Hauppage HD PVR yielding higher video quality. But, I did see one Youtube video from the AverMedia Game Capture HD that was surprisingly much higher in video quality that the rest. It turns out that AverMedia has released a firmware update that bump recording bitrate from 10mbps to 15mbps. Additionally, the AverMedia unit allow you to record with USB harddrives where as the Hauppage HD PVR can only be used when connected to a PC (ie. it has no harddrive storage). To top it off, the AverMedia unit was 25% cheaper ($50) in price. Based on all these factors, especially the fact that you do not need a PC to make recordings, made the AverMedia Game Capture HD the preferred choice. Before I made the purchase, it was important to make sure video quality was indeed good enough and the recorded video (h.264 wrapped in AVI which is not a popular format) has to work inside Adobe Premiere Pro CS5.
So after reaching out to my tech friends, @MichaelKwan from MegaTechNewswas gracious enough to lend me his AverMedia Game Capture HD for testing. Thanks Michael!
As you can see, this post is not a full review. For that you can check outMichael’s review. I will keep this post on point to using the AverMedia Game Capture HD to capture video from an HD DVR.
AverMedia Game Capture HD Results
I found AverMedia indeed has a driver that bumped the maximum recording bitrate to 15mbps (from 10mbps). After flashing to the latest firmware, the captured videos are probably the best quality I have seen from all of the AverMedia Game Capture HD reviews and examples on Youtube. The recorded AVI files did not play nice with Premiere Pro CS5. But a quick re-wrap of the AVI to MP4 using XMedia Recode (a free must have for all your video needs – ie. converting movies so they play on iPad, iPhone and various devices) made the video compatible without loss of video quality.
avermedia game capture hd
The video below was captured at 1080 60i (15mbps) and I added an intro and outro and exported it as a Youtube friendly video (720 30p at 5mbps). This 2 minute clip is pretty darn good as far as quality goes. It contains a mix of regular content and computer animation so this should give you a good idea on what the AverMedia unit can do.
Note that I did not use the supplied component video cables as I had a better set. You don’t need super expensive cables but thicker, well insulated component cables (as a general rule when it comes to home theater guidelines) will give better results. Also note that most TV’s and A/V receivers cannot convert HDMI signal to component but if you have one that can do this, you should be able to use the AverMedia Game Capture HD to capture videos from your Apple TV. This would actually be very helpful in making Apple TV tutorials.
For a very long time, it took users a lot of tech know-how and some luck to download videos from their HD DVR’s. Today, anyone can do this cost effectively using the AverMedia Game Capture HD

[SOLUTION] BlackBerry Cannot Log On to Exchange Server Error

[SOLUTION] BlackBerry Cannot Log On to Exchange Server Error


For all Blackberry owners who are having issues with Desktop Manager syncing properly with Outlook, you may be getting this or a similar message “Cannot log on to Exchange Server error. Please check server access or provide a valid password.”
Here is a quick fix that might help you get back on track.
    1. Connect Blackberry to your computer’s Desktop Manager
    2. Click “Organizer” on left side of Desktop Manager
    3. Click “Reset Settings”
    4. Run the set up process again
    5. Sync your Blackberry
With any luck, this may help to fix that dreaded Exchange Server error.

[FIXED] iPhone 5 Battery Draining Very Fast

[FIXED] iPhone 5 Battery Draining Very Fast


Since purchasing the iPhone 5, I have noticed something peculiar. The battery just seems to be draining much too fast. I did not measure CPU usage or minutes used but as someone with a technology background, something tells me that the battery life on my new iPhone 5 just does not seem to be performing up to par. After some searching, it looks like others are also having the same battery drain issue. There are lots of posts floating around reporting that when an iPhone 5 was initially activated via a “Restore” from an iPhone 4(S) backup (versus setting it up as a new phone), battery life drained much faster as compared to the iPhone 4.
iPhone 5 – Reports of Battery Drain Problems
Personally, I never activated via a back up and instead set up the iPhone 5 as a new phone; and oddly enough, I was also suffering from the battery draining way too fast. More digging lead to many articles discussing ways to disable features and services on the iPhone 5 to minimize battery usage. Yes, it does make sense to slim down push notifications, location services, Bluetooth, Siri, screen brightness and even vibrations etc… The thing was, I have already tweaked all of these settings. Many users also reported disabling WiFi or even LTE allowed them to get more life out of the iPhone 5’s battery. This was not an option for me. I paid for a phone with these capabilities and I want to use it at will.
Yet more reading let to recommendations to put the iPhone 5 into DFU mode and re-run a clean install; citing that a firmware will be updated through this process. For those who don’t know what DFU mode is, not to worry. The solution that I am sharing with you does not require you to enter into this mode.
My Own iPhone 5 Battery Problems
Before following these instructions, use of the iPhone 5 on WiFi plus being on the cellular network would drain the battery at about 10-20% / hour. This was not heavy use either, just some social media apps, email, short voice calls and texting. At this light usage rate, I would barely get to the end of the day before the iPhone needed a re-charge. When out and about without WiFi, the battery drain was even faster. As an example, before I finished breakfast and reading a few important emails, the phone would lose about 3-5% of its battery. This was through very light usage for only 15 minutes or so and it is just not acceptable.
The worst example I can share of the high battery drain is throughout the day, I would swipe to unlock the iPhone 5, quickly check emails, Facebook and Twitter, then leave the iPhone to dim itself after 1 minute. This was in both WiFi and LTE modes. Each time I did this, I can see the battery drain itself by 1% almost every single time. Again, this is just not acceptable.
Reports also show that users in a poor cellular signal strength area will use more battery as the iPhone is continuously trying to connect to a better signal (or something to that effect). LTE in my area is just ok, 2-3 bars and at times would bounce to 4 bars (out of 5). And apparently, LTE sucks up more juice than 3G and we all know that 3G usage already eats up battery quickly. Given this, the odds were stacked up against me in trying to find a fix. I just could not live with the fast battery drain and with more research, apparently this time, I beat the odds.
iPhone 5 Battery Draining Very Fast – SOLUTION
I am actually not sure who suggested this fix (I read quite a few tips and solutions during my research that I lost track) but this was what I tried and it completely reversed the ill effects of the iPhone 5 losing its battery way too quickly. Checking emails, Facebook and Twitter for 1 minute no longer costs me 1% of battery life! In fact, after the tweak, I have checked my email, Facebook and Twitter about 10 times AND sent an email with a photo attachment and have yet to see any battery % drop! Talk about a night and day difference.
If you also have a fast draining battery on the new iPhone 5, I hope this can help you too.
Note: I am running iOS 6.0.1 and experienced the fast battery drain. This solution fixed my problem!
    1. Backup your iPhone after it is plugged in to your computer. Use iTunes to make a backup. Note, this is not just a Sync, it’s a backup. Plug the iPhone to your computer, wait until iTunes detects it. Inside iTunes, right click on your iPhone and start the backup.
    2. On your iPhone 5, go to General >> Reset >> Reset All Settings (follow on-screen instructions). This should not (but I cannot guarantee it) delete any apps or data. It should only revert Settings of the iPhone like, Siri, ringtones and other settings to a default state. But do back up your photos and videos just in case before proceeding. I take no responsibility if your iPhone crashes, dies or if you lose any data after following these instructions.
    resetting iphone 5
    3. After the Reset, the iPhone 5 will reboot. Use the remaining battery all the way down to to 0%. In fact, use it until the iPhone powers itself off. Just to be sure, wait 10-15 minutes after that just in case there is residual juice left over.
    4. Now charge it up to 100% and leave it on the charger for an additional 30 minutes (just in case). This should take 2-3 hours.
Voila! The above fixed my iPhone 5 battery drain problem. The results were instant (right after the 0 to 100% charge up). The iPhone battery meter (image below) showed I used 11% during this 30 minute session of heavy usage – LTE / 3G going through about 10-15 MB of data using email, Facebook, Twitter, various apps, Safari surfing websites and the whole time with music playing. This may or may not seem good to you but I would have never gotten this prior to Reset All Settings. This battery usage rate, although not great, is much more acceptable than prior to the reset.
battery drain after reseting the iphone 5
iPhone 5 Battery Draining Very Fast – Possible Solutions
I am not exactly sure what fixed the battery drain issue on the iPhone 5. Based on what I did, it could be any or all of the following:
    A. Simply performing a Reset All Settings
    B. Simply draining the iPhone to 0% before re-charging
    C. A + B
In addition, I did remember seeing 4-5 crash reports before the Reset. Twice for the Skype app and at least once for the Camera app. Maybe the heavy battery usage was related to these app crashes? After the tweak, I only see a low battery log under Diagnostic & Usage. Perhaps the Reset cleared up some software issues that was somehow related to the battery drain?
So, a good tip is for all new iPhone 5 owners to perform this Reset right after you activate your new phone (before you install apps and add data). Doing it at this time has no downside and may just save you a bunch of hair pulling. Hope this helps.
Note: Did the above tweak work to fix your iPhone 5 battery drain problem

The Best iPhone Accessory – EVER!

The Best iPhone Accessory – EVER!


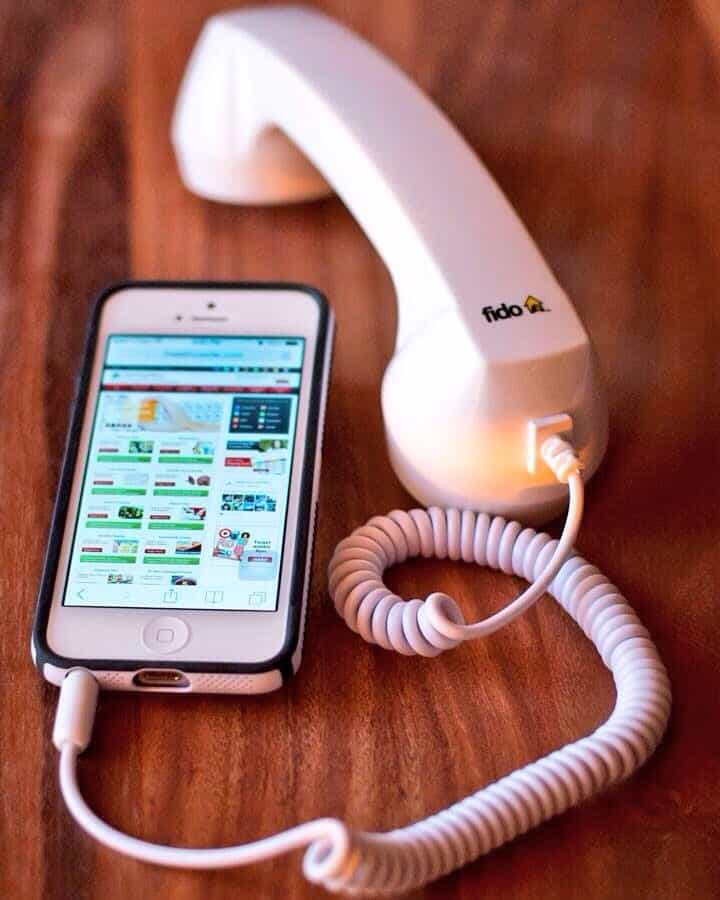
To be honest, I have seen this iPhone accessory at a few retailers in the past and was always intrigued by it; but never intrigued enough to make the purchase. As luck would have it, I happen to be on Facebook when Fido, my mobile provider, posted a giveaway. All I had to do was fill in a form. Being one of the users who completed the form in time, I was informed that my gift will be arriving in a few short weeks.
So here it is, the best iPhone accessory is now in my possession.
Finally, I can now talk on my phone in public without having to hold it! What do you think? Should I use this at my next coffee shop meeting?

Best Responsive WordPress Gallery

Best Responsive WordPress Gallery


So I have been trying to beef up a website and was just not able to find an easy solution to manage WordPress galleries. Many have recommended that I use the powerhouse NextGEN plugin (with over 8 million downloads) but given the high importance of managing photos on a website, I wanted a solution that was not tied to any specific 3rd party plugin. Not only for future proofing but also wanting a solution that was easy to use and maintain in the long run, I am trying to use as much default WordPress functionality as possible. This is especially important given the latest WordPress 3.7 now has auto updates built in.
It has been show many times over that plugins, however popular they may be, can always run the risk of being dropped by the original developer(s) or being purchased and turned into something else. The biggest risk of using a 3rd party plugin is the risk of it breaking the latest WordPress update or have it conflict with other plugins. Either you are starting a new Wordprss site or you are reading this article about managing WordPress galleries probably because your current way to manage WordPress Galleries is not working out.
I could not believe it was so difficult to accomplish these 3 things in WordPress:
  • Display thumbnail at a specific size on the album post / page
  • Showcase images in a lightbox when users clicked on a thumbnail
  • Display images in a responsive environment across platforms and devices
Because of these requirements, I almost gave in and turned to a 3rd party plugin (or a combination of plugins) to manage the WordPress Gallery. After many plugin installs, testing and deactivations, I finally found a solution that will work. Be warned, it’s not the prettiest or the most flexible, but for any website that is looking for an easy-to-use system to showcase photos, this is what you can do.
The best part of this solution is that it takes advantage of using the default WordPress Gallery without a 3rd party plugin. Well, you do need a plugin, but that plugin is not a 3rd party one; it’s called Jetpack and released by WordPress itself. This set up has huge bonus as it is responsive and behaves properly across devices and platforms. Many of the most popular image managing plugins currently do not not display properly across devices.

Best Responsive WordPress Gallery – Setup

Here is what you do to set up the WordPress Gallery.
    1. Install the Jetpack plugin
    2. Enable the Carousel Feature within Jetpack. Note: you may need to create a WordPress.com account in order to activate and authorize Jetpack. Just follow the on-screen instructions.
    jetpack-carousel
    3. Add Media in a post using the WordPress Create Gallery function.
    add-media-button
    create-gallery
    4. You only need to run this step if your default WordPress is not set up with the correct thumbnail size.
    Under Settings >> Media, you will see something like this:
    This is the perfect size for what I needed. If this is not the correct size to display your thumbnails, either adjust this setting or do the following.
    Again, only follow these instructions if your default thumbnail size is not the correct size that you want. To manually tell WordPress what image size you want, all you have to do is add a simple piece of code after you insert the actual gallery. You will have to know WordPress functions.php settings. I have this in my functions.php file:
      add_image_size( 'home-bottom', 150, 150, TRUE );
    So I added the image size variable “home-bottom” in my WordPress (I use text editor) like so:
    gallery-thumbnail-size

Test Your Own Thumbnail Sizes

For my set up, a thumbnail of 150×150 fit perfectly, even across devices. Test your own sizes and see which works best. For those with a slightly less wide website, try also 75×75. That works well too. Remember, if you don’t have this thumbnail size in your functions.php file, simple open the file in the WordPress editor, locate the “add_image_size” area and add your own size.
Now you can upload your gorgeous images into your WordPress site and know that it will be displayed properly with the correct-sized thumbnails. Your photos will also be viewed in a beautiful lightbox as well. I hope Jetpack developers add a thumbnail sizing feature in future releases so all of the above will be automatic.
For a demo, go to this WordPress responsive album here. For me, this is the best responsive WordPress Gallery set up, hands down.
Note: After you change the thumbnail display size, remember to regenerate your thumbnails so the new size is displayed. Install the Regenerate Thumbnails to quickly regenerate all thumbnails on your site.

SSD – The Best Computer Upgrade in the Last 20 Years

SSD – The Best Computer Upgrade in the Last 20 Years


I have been using a computer since the 486 days and have upgraded every piece of hardware inside a PC. This SSD upgrade, by far, is the best upgrade I have ever experienced. There is no other hardware upgrade that have resulted in such a massive performance increase, hands down. Here is how I did it.
It was that time again, to determine whether I should invest in upgrading an older PC. It is 2015 today, the PC in question was purchased from Dell in 2008. Granted, it has the tried and true Q6600 so adored by many PC enthusiasts in its day. This was one of the most well known CPUs given that its stability even when overclocked. Unfortunately, the Dell Vostro 410 that I have in my possession has a locked BIOS and overclocking was not possible so it’s only running at 2.4GHz. The new SSD to be installed is the Crucial BX100 250GB. Current rig is set up like so:
Dell Vostro 410 (purchased in 2008)
– Intel Q6600 CPU
– 4 GB RAM
– nVidia GT-240 GPU (not original; added after purchase)
– multiple harddrives (4 to be exact and not original)
– Windows 7 64 bit (freshly installed 6 months ago)
– newish power supply
This machine has served me well. It was used for business applications like Microsoft Office but it was also used to manage all my media (photos and video) and I was even able to edit HD video using Premiere Pro CS5. It was slow to render HD video but I have been able to live with it. Until recently, the machine would slow to a crawl when many programs were opened and RAM usage reached 3GB+. Shutting down all programs or doing a reboot brought the PC back to running smoothly again. But in some projects, it’s just not possible to reboot or shut down any more programs. So my research began.
My motherboard was spec’ed by Dell to max out at 4GB of RAM but a few other Vostro 410 owners have reported that they had installed 8GB of RAM and got the machine to recognize all of it. Currently, the machine has 4x1GB and all 4 slots were full. Since I thought the lack of RAM was causing disk thrashing, I went searching for 4x2GB of DDR2 PC2-6400 RAM. There were some available on ebay and craigslist and there were even some vendors still selling brand new, unused stock. But the high price from all made it prohibitive to upgrade to 8GB of RAM. Not sure why so many sellers were asking $50-$125 for such old paper weight. I guess it was very expensive when new and no one wanted to sell it for cheap.
Nonetheless, that made me consider swapping out the motherboard, CPU and RAM. This would get me newer DDR3 RAM (which was almost the same price as the used DDR2 RAM that my current motherboard needed) and it would give me more CPU horsepower and upgrade my SATA II connection to SATA III. Then I realized because I have a Dell desktop, my case my also need to be upgraded since it may not be compatible with the new motherboard. This would mean getting a new PC less the harddrives, not something I wanted to do at this time. This was getting to be more of challenge than I thought.
So the next step lead me to do some reading on how wonderful a new solid state drive (SSD) was at bringing old PC’s back to life. There were some challenges to overcome when upgrading an older system with an SSD but I understood the road blocks and was confident I could overcome all of them.

Hurdles When Upgrading to SSD

All PC enthusiasts love how fast a newly Windows 7 install feels. I have done a clean install every now and again to get Windows to run faster after it has slowed with age. But the last few times I upgraded the harddrive in my PC, I simply cloned the old setup to the new drive. It has worked well. The biggest disadvantage of doing this is you are bringing baggage to the new drive. Windows slows down over time, this is a fact. And even though you are installing a faster harddrive, you are still bringing dirty laundry to the party so to speak . I ultimately decided to go with cloning instead of a fresh Windows 7 install as I don’t have to re-install all the software and re-setup things again.
When you install Windows 7 on an SSD, there are a couple of settings that are automatically taken care of for you. When you clone over an existing Windows 7 install, these settings have to manually tweaked. Here are a few things I manually checked to make sure Windows 7 would run happily on the new SSD.

Checking SSD Partition Alignment

It is important to make sure your harddrives are aligned correctly so Windows can run on an SSD as fast as possible. In Windows 7, type this in Command Prompt:
– wmic partition get BlockSize, Index, Name, StartingOffset
You will get a screen that looks like this:

Now you divide StartingOffset by 4096. If you get a whole number, then your drives have been aligned properly. As you can see, all my drives are indeed aligned properly. I only checked Disk #0 (C Drive) before the cloning and it was definitely not aligned to a multiple of 4096. As I have a Western Digital drive in the PC, I was able to use Acronis WD to do the cloning. I have had great success with this cloning software in the past so decided to use it again. Apparently, Acronis WD FAQ lists that disk alignment was one of it’s features when cloning. Turned out it worked flawlessly.

IDE, SATA, AHCI Oh My!

Althgouth SSDs run fine and speedy in IDE mode, it’s not running at max speed until you enable AHCI. On my crippled Dell board, the BIOS only had IDE or RAID modes. But after some research, I found out that many Dell motherboards could have AHCI enabled simply by running RAID mode. So off I went to change IDE to RAID to see if indeed AHCI was enabled. The challenge here is once Windows 7 is installed in one mode, it won’t boot properly when you change the BIOS setting from IDE to RAID. Luckily, there was a fix for users who wanted to switch modes after a Windows installation. It requires editing the registry. From IDE to AHCI, you would change these settings before making the change in the BIOS.
In the Windows 7 registry, go to:
– HKEY_LOCAL_MACHINE\SYSTEM\CurrentControlSet\services\msahci
Right click on Start (right panel) and change the Hexadecimal from 0 to 3.
Now go to this:
– HKEY_LOCAL_MACHINE\SYSTEM\CurrentControlSet\services\iaStorV
Right click on Start (right panel) and change the Hexadecimal from 0 to 3.
Now shutdown Windows and change IDE to RAID in your BIOS. You should be able to boot back into Windows.
Note that although I am running in RAID mode, I did not set up any RAID drives; all drives are as before. Windows can run properly like this and you are getting the benefit of AHCI.
To do a quick check, download and install AS SSD, a popular SSD benchmarking software. As a double check, AS SSD will tell you if your drives are aligned and if AHCI has been enabled.
– iaStorV means I am running in RAID mode and AHCI is enabled
– 1024 K means my drive is aligned properly
Both of these parameters are green; if it did not pass, the items will be in red. Here is the SSD in IDE mode. It was still very speedy when using Windows.
When I ran AS SSD in IDE mode (above), it was still speedy but AHCI / RAID (below) increased performance significantly so I was very happy with this tweak. You will see these read and write figures are not the fastest for theCrucial 250GB BX100 SSD when compared to others users but it is not the worst either. Given that this drive is powering a system from 2008, I am more than happy that these benchmark results fall within the norm as compared to other users with the exact same drive except in much newer systems!
Although Windows reports that AHCI was enabled while running RAID mode, I had to be sure. And I can confirm that indeed during boot up, I now see a message that AHCI is enabled.

Here are screenshots of the Windows Experience Index


Keep Pagefile on C-Drive

Many users recommend moving Pagefile to another drive after installing an SSD. This is to extend the life of the drive. This may be true with earlier generations of SSDs. The ones currently on the market may very well outlast all other components in your PC. Keeping the SSD in C-Drive helped to keep the Vostro fast, even when RAM was maxed out. I literally opened 30 sessions of Chrome, 20 sessions of IE, played an HD video, opened iTunes, kept the antivirus scan in real time mode and all the while editing a large Photoshop file. Task Manage shows that RAM usage was at 3.75GB or so (pretty much maxed out) and Commit memory was almost hitting 7GB. This tells us that the 4GB of physical RAM was all used up and Windows was using another 3GB on the SSD as a scratch disk. In the old set up, the PC would stall by now and become extremely laggy. With the new SSD, Windows hesitated ever so slightly but was completely usable. Almost to the point where you wouldn’t even notice that there was no free RAM left. For those who have experienced low RAM issues, you know this is where you have to close programs or even do a reboot. Not with an SSD, it just kept going!

TRIM – Windows 7 Handles It

I won’t bore you with what TRIM is but just in case you really need to know, here is a good description of TRIM. You want TRIM enabled when running an SSD and Windows 7 handles it, that’s pretty much all you need to know. To do a check, type this into command prompt:
– fsutil behavior query DisableDeleteNotify
You will get a return of either 0 or 1. A zero means TRIM is enabled. If you get a 1, use this command to set it properly.
– fsutil behavior set DisableDeleteNotify 0

Other Windows 7 Tweaks When Running SSD

Here are some basic tweaks that I made to take full advantage of the fast SSD.
  • Disable defrag in Windows 7
    • You won’t need to defrag the SSD in Windows anymore
  • Disable Indexing in Windows 7
    • Your new SSD is so fast, you won’t need to index the drive; it’s really that fast
  • Because I cloned from a current Windows setup, all my applications were still the C-Drive. This made all apps, including resource hungry iTunes, Office suite, Photoshop and Premiere Pro very speedy to load and to use.
  • Use C-Drive as a scratch disk for programs like Photoshop, Premiere Pro etc…

Tweaks Before Cloning Windows 7 to an SSD

SSD – Best Upgrade in 20 years of Computing

As I mentioned, upgrading from a normal HDD to an SSD was the single best upgrade I have ever experienced on a PC; and I built my first PC when it was a Pentium-90. Performance went through the roof and this is in a 7 year old system! Granted, this system has been well maintained over the years with regular cleaning (software and hardware), installed a new GPU, harddrives, power supply and even the CPU was properly re-seated with thermal paste. But I am still shocked at how fast these are:
  • Windows boot up (so fast you won’t believe it; I rebooted multiple times just to make sure it wasn’t some sort of glitch)
  • Windows shutdown (even faster, you won’t believe it)
  • Opening applications is also blazingly fast, even large programs like Word, Adobe Illustrator and Premiere Pro
  • Working with large files such as a large Photoshop file
    • No filter inside Photoshop took more than 2-3 seconds even on very large files; most took less than a split second. If you have worked with Photoshop, you will know how crazy this sounds.
  • 3-5 seconds after you see the Windows background and Start button during boot up, Google Chrome can be launched and is fully ready to be used
    • With a traditional HDD, even on a new system, this could take at least a minute or more
So even with a system that only has 4GB of RAM, this 7 year old Dell Vostro 410 is now even faster than a two year old Dell Core i5 with 8GB of RAM. There is no comparison actually, the SSD machine is significantly faster in day-to-day use.
If you are considering an upgrade to an SSD, make sure your motherboard can run AHCI. Even if it cannot, running an SSD on IDE is still very fast, much faster than any mechanical drive out there. Re-read the checklist above. If you current system is compatible, I can guarantee you that upgrading from a traditional mechanical harddrive to an SSD will be the best upgrade you have ever experienced as well. The Crucial SSD BX100 250 GB was on sale at only $120 before taxes. Amazing!

Vostro 410 – The Ultimate Upgrade Guide (SSD, RAM, GPU + Xeon CPU)

Vostro 410 – The Ultimate Upgrade Guide (SSD, RAM, GPU + Xeon CPU)


It was only a few months ago that I upgraded an older Dell Vostro 410 desktop with an SSD. This was not the first upgrade for this aging PC as it was purchased from from Dell in 2008 but it was one of the best upgrades I have ever done. More on that later. Dell sold many of these units and most of them are still pretty powerful even by today’s standards but with just a few simple upgrades, it will give even more life to this oldie but goodie. Here is what the desktop looked like at the time of purchase. Specs were pulled by Speccy, which is a great program to see your PC hardware specs by the way.

Vostro 410 Desktop – 2008

  • CPU: Intel Q6600 (2.40GHz,2X4M L2Cache,1066FSB)
  • RAM: 4 GB of DDR2
    • Dual Channel DDR2 SDRAM 667MHz – 4 DIMMs
  • Motherbaord
    • Manufacturer: Dell Inc.
    • Model: 0J584C (Socket 775) (A00)
    • Chipset Vender: Intel
      • Model: P35/G33/G31
      • Revision: A2
    • Southbridge Vendor: Intel
      • Model: 8280 1IR (ICH9R)
      • Revision: 02
    • LPCIO Vendor: ITE
      • Model: IT8718
    • Latest BIOS (may not be original version, cannot remember): Version 1.0.3 (6/20/2008)
    • Ram Slots: 4 (with maximum RAM support of 4GB – this is false, read below)
  • ATI 128MB Radeon 2400 Pro
  • 500 GB harddrive (SATA 7200 rpm)
  • This PC was plenty fast for 2008 and easily accommodated business applications, light gaming, photo and even video editing. The gem here is the Core 2 Quad Q6600 processor. Enthusiasts were easily overclocking this CPU to get even more speed but unfortunately, the Dell BIOS has these settings locked so I have been running it at stock speed (2.4 GHz) since the beginning. Even then, as is, this stock Vostro 410 was fast enough for everything I threw at it; note, I am not a hardcore gamer.
  • Dell Vostro 410 Upgrades

    Over the years, the GPU, power source, dvd writer and harddrive all got replaced and even Vista became Windows 7. A few months ago, I upgraded the mechanical harddrive to an SSD and that really gave new life this desktop. Using an SSD as the OS drive literally made this PC the fastest it’s ever been (by far). This is no surprise and I still stand by my post that an SSD is the best upgrade in the last 20 years of computing.

    Vostro 410 8 GB RAM Upgrade

    The GPU was upgraded to a an nVidia-based GT-240. It’s an entry level GPU but does have 1GB of DDR5 RAM and has handled everything I have thrown at it including editing 1080 60p HD videos in Premiere Pro. It’s not a high performance GPU by any means but it got the job done. With only 4 GB of DDR2 RAM, this may be the system’s bottle neck now. Since 2008, I have actually been looking to bump RAM to 8 GB but Dell specs the 0J584C motherboard to max out at 4 GB so after seeing that, I never gave it much thought and learned to work within this limitation. In fact, not just in 2008 but even today, a system with 4 GB of RAM will run well if you are not gaming or opening 30+ web browsers at the same time. Then I found a few users on the Dell forum saying they got their Vostro 410 desktops to recognize 8 GB of RAM. That was interesting news! Further research showed that part sellers on ebay also listed this particular motherboard to be able to handle up to 8 GB of RAM. To make a long story short, I found an ebay seller who was selling 4 x 2GB of brand new DDR2 RAM that works on Intel-based motherboards and it was priced at 50% of what branded RAM manufacturers were asking for. Took the plunge, swapped out the original 4 x 1GB and lo and behold, this PC booted up just fine and showed 8GB of RAM ready for use. Some other Vostro owners were speculating that this desktop was spec’ed to max out at 4 GB of RAM so Dell, at that time, could push their more expensive XPS line that was promoted as being able to handle 8 GB of RAM. True or not and whether Dell officially supported 8 GB on this PC or not, 8 GB is indeed recognized by BIOS (1.0.3) and Windows 7 can utilize all of it. I am one happy camper given I paid about $35 USD for 8 GB of brand new DDR2 800 Mhz RAM. IN fact, the original sticks were only 667 MHz so that is a slight speed upgrade as well as capacity. As I mentioned in the SSD upgrade post (link above), I still cannot believe used 8 GB DDR2 RAM is still going for $50 – $100 on the market, sheesh! Glad I found the right ebay seller.

    Vostro 410 CPU Upgrade – 771 to 775 Mod

    The Q6600 was so snappy that after installing 8 GB of RAM, I thought I was done. My motherboard looked to be able to take a Q9650 but these are still expensive for an upgrade (about $80 USD) on ebay and not worth the speed gain it in my opinion. But, I discovered that there is a mod that actually allows many Socket 775 boards to accept a 771 CPU. It’s call the 771 to 775 mod and after digging into the specifics, my Intel chipset of 35/G33/G31 was reported to be compatible with various Xeon CPUs. The one I had my eye on was the X5450 Xeon processor. Xeons are server-based CPU’s and the X5450 is supposed to be comparable to the Q9650. The only difference is that ebay sellers are asking only about $20 USD for the Xeon. It was a no brainer, I had to try the mod. To learn more about the 771 to 775 mod and to check whether your board is compatible, read LGA 771 to 775 Adapter (MOD) – Run faster Xeon CPUs in a Core 2 Quad motherboard. Your best bet is to check the manufacturer’s manual to find out what CPU’s are compatible with your motherboard. If it can take a certain Core 2 Quad, the article listed previously will show you the most compatible Xeons that it may also accept. Dell lists the Vostro 410 as being compatible with any “Core 2 Quad processor with a FSB of up to 1333MHz”. This gave even more assurance that the X5450 should be compatible.

    Undervolting – Dealing with Temperature After Upgrading Q6600 to X5450

    It took patience to install the adapter (metal strip with sticky tape) on the Xeon itself and even more patience and steady hands to modify the motherboard socket, but persistence and careful planning prevailed. This 2008 Vostro 410 desktop is now running a Xeon X5450 with 8GB of RAM + an SSD. The Q6600 held it’s own but I have to say, the X5450 just does it better. There was a minor issue with CPU temps increasing after installing the X5450 but I was able to use ThrottleStop 6.0 to undervolt the Xeon to bring temps closer to what the Q6600 was showing. Remember, I ran the Q6600 at a stock speed of 2.4 GHz and now the X5450 at up to 3.0 GHz.
    If you have never heard of undervolting, it’s a process to force the CPU to use less power to run without sacrificing speed. The X5450 undervolted nicely (stable, no crashes) and temps were even 8-10C lower when undervolted at 3 GHz versus running stock voltage at 2 GHz. So that was a nice outcome. In fact, I like this so much that I am going to undervolt my laptops to get lower temps and a longer battery life out of them.
    An interesting note about undervolting and adjusting the multiplier on the Xeon with this motherboard; by default, ThrottleStop 6.0 was not able to adjust the CPU multiplier. I had to enter the BIOS and “enable” the Limit CPUID Value. By default, this is disabled. Odd thing is, for Windows XP and newer OS’s, you are supposed to disable this feature. But by enabling it and after a reboot into Windows, ThrottleStop gained access to select the CPU multiplier from 6.0 to 9.0 in half steps. Making this adjustment somehow “unlocked” the multiplier settings on the Xeon X5450 and it can now be undervolted. After this function was unlocked , I disabled Limit CPUID Value again in the BIOS but the multiplier stayed unlocked. Not sure why this was the case but it turned out in my favour.
    The Speed of a CPU is basically the “Multiplier x Motherboard Clock Speed”. My Dell motherboard clock speed is 332.5 MHz. During power saver mode (SpeedStep), the CPU frequency would fluctuate between 2.0 GHz (6.0 x 332.5 Mhz) and 3.0 (9.0 x 332.5);  it does this by regulating the multiplier (ie. dropping it to 6 to get the CPU to 2.0 GHz).  The only slight issue was that at the beginning, it was creating a little too much heat for my liking when running at 3.0 GHz. As mentioned, I adjusted the voltage (unvervolted) in ThrottleStop from 1.275 to 1.1. This significantly dropped temps even when I disabled SpeedStep and ran the Xeon at 3.0 GHz all the time. ThrottleStop does have the capability to set voltage and multiplier independently so in addition to undervolting, I have also enabled power saver mode to further drop power usage & core temps during less activity. In short, I am running static voltage at 1.1 and a dynamic multiplier (6 to 9), which in turns determines the final CPU frequency. I am extremely pleased with this combination as final CPU temps are now within 2-3 degrees Celsius of the Q6600 running at stock 2.4 GHz!


Happy Upgrades

The original system with an SSD upgrade still running the Q6600 and 4 GB of RAM was keeping up with daily tasks. But after a low-cost CPU and RAM upgrade, an old workhorse became a new and improved workhorse. The SSD upgrade gave the most significant (I would say 3-4 times) speed performance for general computing, especially for Windows 7 boot up. Launching programs, using Photoshop for photo work and editing HD video in Premiere Pro worked wonderfully well. Then the later bump in RAM and the Xeon CPU upgrade just took the PC to another level. For heavy everyday use, photo and video work, web development and business applications, the Vostro 410 just keeps on ticking; and, it’s faster and stronger than ever before. Of course, I do not recommend anyone to buy a used Vostro 410 today just so you can perform these upgrades but if you have this PC in your possession, spending about $190 ($120 CAD for an SSD, $35 USD for 8GB of RAM and $20USD for a Xeon X5450), is highly recommended. Even if you don’t upgrade the CPU, just moving up to an SSD and 8 GM of RAM yields a good performance boost. Besides hardcore gaming and intense video editing, this rig is now ready to take on any task that I throw at it.
If you have a Vostro 410, feel confident that it can take an SSD, more RAM than Dell says it can and even a faster CPU. Happy upgrading! Who else has an older PC that they still find useful?